|
|
|
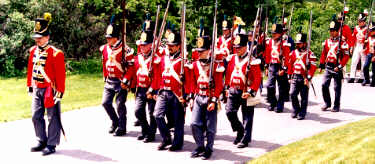
The scene is the Niagara Peninsula, summer, 1814. American troops under Maj. General Jacob Brown cross the Niagara River near Fort Erie, a small British fort, and force it's surrender. The landing has not gone unnoticed by the new British commander in the region, Maj. General Phineas Riall. Believing that Fort Erie is still holding out, and that a large portion of the American army is investing it, he moves his small force south from Fort George to the town of Chippawa, half way down the peninsula.
Brown has not been idle, however, and has been moving up the coastal road to attack. His advance force contacts British and Canadian skirmishers near Chippawa, and he encamps his army, planning to attack the enemy entrenched on the other side of the river.
His camp comes under fire from Canadians and Indians in the adjacent woods, and he orders his militia brigade and Indian allies under Brig. General Peter B. Porter to chase them off.
Unbeknownst to him, General Riall has chosen this moment to cross the river and attack what he believes to be an inferior force of poorly-trained regulars and militia. He is soon to find out that he is wrong.
- The Combatants -
NOTE: Figure Scale is 1:20


British,
Canadian, and
Indian forces:
Commander-in-Chief : Maj. Gen. Phineas Riall
1st Brigade: Commanded in person by Phineas Riall
1st Foot Reg't (Royal Scots)
22 figures, Veteran
100th Foot Reg't
22 figures, Veteran
8th Foot Reg't (King's Own)
18 figures, Veteran
2nd Brigade: Commanded by Lt. Col. Thomas Pearson
Light Companies of 1st, 8th, and 100th Foot Reg'ts
6 figures, Converged
2nd Lincoln militia
10 figures, Flank
Western Indian Allies
6 figures, Motivated
Grand River Indian Allies
10 figures, Interested
Unbrigaded:
Sheppard's Command, Royal Artillery
2 Medium guns (6 pdr.) and crew
Armstrong's Command, Royal Artillery
1 Heavy gun (24 pdr.)
1 Howitzer (5.5 inch)
Horton's Command, 19th Light Dragoons
4 figures, Line
US Regular,
Militia, and
Indian forces:
Commander-in-Chief : Maj. Gen. Jacob Brown
1st Brigade: Commanded by Brig. General
Winfield Scott
Ninth/Twenty-Second Infantry
26 figures, Veteran 1814
Eleventh Infantry
22 figures, Veteran 1814
Twenty-Fifth Infantry
18 figures, Veteran 1814
Rope's Company, Twenty-First Infantry
3 figures, Veteran 1814
3rd Brigade: Commanded by Brig. General Peter
B. Porter
5th Pennsylvanian Infantry
10 figures, Volunteers
Seneca, Oneida, Cayuga Indian Allies
16 figures, Motivated
Mixed U.S. Regulars
3 figures, Veteran 1814
Unbrigaded:
Towson's Command, U.S. Artillery Corps
2 Medium Guns (6 pdr. & Biddle's 12 pdr.)
1 Howitzer (5.5 inch)
Ritchie's Command, U.S. Artillery Corps
1 Medium Guns (6 pdr.)
1 Howitzer (5.5 inch)
Harris' Command (U.S. Dragoons)
4 figures, Line

U.S. Regulars,
Militia, and Indians:
The First Brigade
sets up within 12" of assembly area "A"
, on either side of Streets Creek.
The Third Brigade sets up in the woods
within 12" of assembly area "B".
This is an excellent introductory scenario, as the troop strengths are even, both sides have Artillery, Light Infantry and Dragoons, allowing players to test their skills with a little bit of everything.