|
|
|
- presents -
"The
Feldmachink"
The Greatest
device ever invented, ever. I'm serious.
Take a look below..........
Last Update:
Here are the specs................
Amazing, isn't it?
What the devil is
it, man!
Alright,
I'll tell you. The Feldmachinck, who's name means "that machine there,
whaddaya call it....."
is a device which ALLOWS
FULL HIDDEN MOVEMENT
IN
ANY GAME, WITHOUT THE SERVICES OF A REFEREE!!!!!!!!
No
dummy counters, face-down dominios, giving away your position for spotting,
used in other so-called
hidden movement systems. This bit of insrtumentality actually
allows for FULL HIDDEN
MOVEMENT, AND WORKS 100% of the time, in 100% of
games, board or miniature!!
And it's TOTALLY FREE!!!!!!!
The Feldmachinck
was designed to allow two or more players to use hidden movementwithout
using a computer. But how? I tried everything. Alpha-numeric
systems required disclosure.
Codes, colour or otherwise, the same thing. The only
solution was instrumentality,
which did the comparing of positions for you, without
revealing any details. Please
follow the instructions closely......
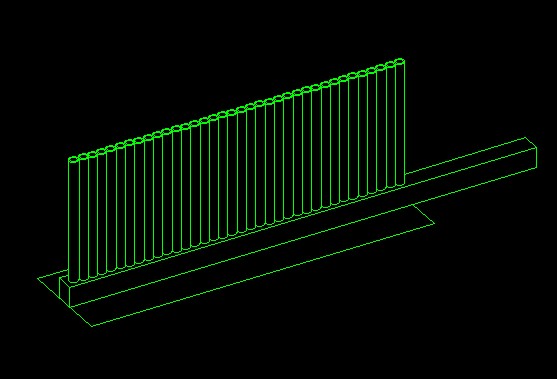
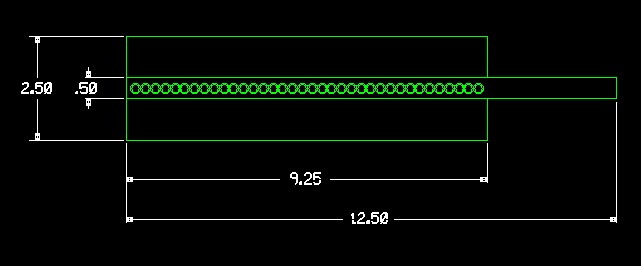
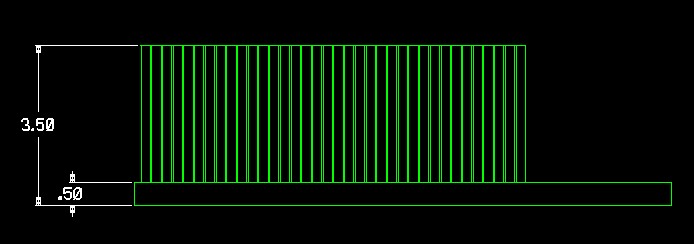
1) Build the device above.
-Use 1/4" diameter plastic
tubing, cut into 3" lengths, for the uprights.
-Use 1/2" balsa wood beam
to rest the uprights on.
-Use a sheet of cardboard
or plastic card beneath the balsa wood so it doesn't
tip over.
-Glue it all together with
white glue. For heaven's sake, let it dry
before using!
2) Spray paint the whole thing a dark colour, or at least the uprights.
3) Paint numbers on each upright, 1 to 45 (example only- see below)
4) Using 1/8 wooden dowels,
cut out, say, 12, at 3/4" lengths.
Cut
another 12 at 2-3/4" inch lengths.
Now that you've built it, I'll tell you how it works!
I refer you to the following grid of a 9' by 5' miniatures table:
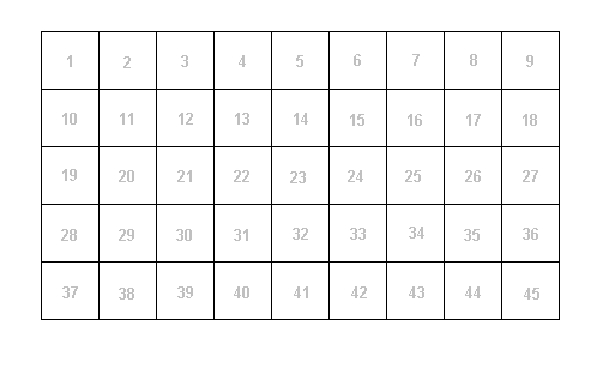
Draw your mapboard on the grid: Here's an example-

Now then :
before the the set up of forces, players decide a few things
about the board. Which areas are always visible?
This will save you time.
On our sample board, say areas 13-15, 21-25,
30-34 are always visible.
Therefore, any troops in these areas must at
all
times be on the tabletop.
They cannot
be hidden. You could agree and say, maybe, that the woods
in area 13 and 15 are dense enough to hide troops.
Therefore, players
with troops in open must expose them at all times,
while troops in the
woods may be hidden.
Having done this, you may go further. You
may say that troops in areas
7-9, 17-18, and 26-27 may only be seen
from adjacent area or by troops
on the hill in areas 16, 25, and 34. Same deal
for the other hill. Or you can
go further; you can say that troops may hide
on the reverse slope of area 25.
It's up to you and your buddies. Please be gentlemen.
Now, having established this, LET'S
USE THE FELDMACHINK!!!
ARE YOU READY? I'M SO EXCITED!!!
Let's say the the French in a French &
Indian War scenario have troops
and guns in area 22 and 23. They
also have some Coureur-de-Bois in
area 4 with some Indians. The British have 2
battalions of the 60th foot
(Royal Americans) in area 29, and 3 companies
of Roger's Rangers in
area 1. Some skirmishing New York militia
occupy area 21.
Where do we stand? The French in areas 22
and 23 are on the board.
That's it. Turn one begins.
The C-de-Bois in area 4 start to
move toward area 21. They are in woods,
however, and so they are still in area 4 (it's
slow going). The Troops in area
22 and 23 start a shoot-out with
the Militia in 21. The 60th lurches forward,
but they are still in area 29. Roger's
Rangers, which were on the border of
area 2 at start, move into it. FELDMACHINK
TIME.
The French player grasps the beloved Feldmachink,
almost lovingly......
(OK, I'll stop) He then places one of the short
dowels into tube 4,
representing the position of the C-de-Bois, without
the English player
seeing him do it!
He then passes the Feldmachink over to the english
player. Without the French player looking, he
places a long dowel in
into tube 29 and 2. Since neither of them
protrudes, he knows
there has been no contact. Now without
looking closely, he dumps
the contents of the feldmachink (by turning it
over) into a bag with the
other dowels, so that neither player knows
who put what where.
Easy? Do this every turn. When a long rod
does protrude, the British
player simply shows it to the French player,
and they place the units
on the tabletop. Simple!
Fast forward a few turns. The C-de-Bois, having
snuck into the strip
of woods in area 13 suddenly break cover
and rush the skirmishers
on the hill. They panic, break and rush headlong
into a battalion of the
60th, which was marching obliviously to their
support, breaking them
too. Having topped the hill the C-de-Bois see
the panic below, and
call up the Regiment de la Reine from area 22
to finish them off.
Fast forward a few turns again. The remaining
battalion of the 60th
has covered the retreat and fallen back into
area 10. They have
chased off the C-de-Bois, but at a heavy cost;
they can't hold out
against the fresh reg't de la Reine in area 11.
Huzzah! Whooping and hollering, the Rangers let
go a volley from
the woods skirting area 11 (our rules say you
can only see 2" through
deep woods). The French halt, shaken and turn
to face the new threat.
Then come the 60th on with the bayonet! La Reine
panics and flees
before contact. There is a general retreat called
by the French, who
begin to retire towards area 26.
Several turns later English reinforcements in
the form of 33rd foot regiment
enter area 40, while the Rangers and the60th
have reached area 33. The
French have reached area 26, but leave
a company of Montreal militia on
the high ground of area 25. Feldmachink
time. The French place a short
dowel in tube 26, as no English are visible
on the hill or adjacent to
automatically spot them. They should be taken
off the board. The militia on
the hill are in the open and must remain visible
on the board. The English
place a long dowel in area 40. The Rangers
and 60th are spotted by the
French on the hill so remain on the board. No
hidden units are spotted.
NOTE: If the English had a unit in the
woods in area 35, they would have
placed a long dowel in areas 8,9,17,18,26
and 27, and would have spotted
the French in 26. I could go on, but I
think the point has been made.
Do
you think any of this would have happened if you had the troops
in the woods or the 60th start the game as
dummy counters, or worse,
on the tabletop?
Try it out, friend. It'll revolutionize
any era. For boardgames with
hexes, create a blank board with the same hex-spread,
but over-
write it with mega-hexes, (that's a hex with
the six surrounding hexes)
and number them in the same way! Enjoy!
Don't forget to e-mail me with comments!
It's the least you can do!