"If you do not desist your opposition to the British Arms, I shall march this army over the mountains, hang your leaders, and lay waste your country with fire and sword.
- Major Patrick Ferguson, 1780
Welcome friend, to the page that asks, "King or Congress"?
---------------------------
Contact us
The Perfect Captain
---------------------------
A Campaign game of Partisan Warfare in the
American Revolution
What is this game about?
Based on the same system as 'Tinker Fox' and 'A La Huguenotte', Swamp Fox adds a different twist- this is not a game of Garrison Warfare so much as one of Partisan warfare. The first scenario, "Ferguson Raises the Back Country" is set in South Carolina after the fall of Charleston to the British under Cornwallis. Players take the roles of Patriot and Loyalist commanders in the back country trying to win 'hearts and minds' while keeping their opponents off balance.
For use with our miniatures ruleset, 'Patriots',
sim'lating warfare of that smaller sort
How about some Patriots links?
Southern Campaign
Newsletter!
Tons of good articles
The Battle of King's Mountain
End of the line for Patrick Ferguson
Three Months in 1780
A closeup of Partisan War
The Patriot Resource
A good basic source of info on personalities and general background
Revolutionary War battles
A omprehensive list of engagements from the period
Uniform Guide
Painting up a few units? This will be of inestimable help
Southern Campaign.....
Campaign!
A rival ruleset and campaign system... well done! We think this looks really good.


Turn 1-2
Turn one had the Loyalists under Ferguson move into Henderson's plantation to make a base in rebel territory. The district has been "cowed" by the patriots, so they won't give any support or supplies until Ferguson gets settled. He brought some supply caches with him in the meantime. Another force (can't name the officer or force, my opponent is reading this) moved from Musgrave Mills to Tyger Folks to build the supply line to Henderson's. Both of these went off without incident. The detachment at Rocky Mount tried their hand at recruiting but no one showed up.
The Rebels started off in the Patriot Off-Board Zone (North Carolina) where the living is easy and the British can't get at them. From there they swooped south to gather supplies and spook the loyalists. Most important, they marched a detachment with a "Partisan" officer to Winnesboro who then vanished off the board (actually into an adjacent district unknown to me?
The Second turn had the loyalists consolidating, requisitioning supplies at Princes Fort while trying to cow both Henderson's and Tyger Forks. They only succeeded at the Forks, leaving Ferguson in unfriendly territory.
At the same time, the Partisans in the south emerged and attacked the Loyalist outpost at Chestnut's Ford! Being only a company in strength, we went for a Small Engagement resolution instead of a tabletop. The Tories got shot up and fled to Broad River. With their victory the district went to cowed for the Patriots, severing the Loyalist supply route to Saxe-Gotha. Now only the Rocky Mount-Camden route remains.
The real surprise came when a Patriot force entered Henderson's Plantation with a seize order. They had not reconnoitered the post but felt they had enough men to take on anything. We halted the campaign and went to the Engagement rules to see what kind of battle would be fought. Rolling to see who the "best shifter" was, the Patriots under McDowell doubled Ferguson's score, leading to an advantaged battle! This was disastrous for the Loyalists; the Rebels could now CHOOSE from among six scenarios, rather than fight a set piece or random engagement. They chose "Advanced Post", enabling them to occupy the Plantation itself at the beginning of the scenario with two companies, forcing their opponents to set up in a safe corner away from the well ensconced Rebels.
Turn 2 Board
Campaign Replay
Scenario 1, Ninety-Six: Ferguson Rallies the Back Country
To see the scenario including historical introduction, victory conditions, forces and special rules, click here.
* * *
The Battle of Henderson's Plantation
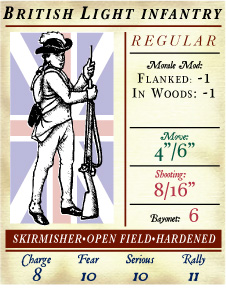
Ferguson had three excellent Tory Light Infantry companies (two of his own American Volunteers and one of the British Legion), along with a company of South Carolina Militia. He decided to keep the Militia off-board as a "Covering Party", to keep casualties low in case of a retreat. Figuring the enemy outnumbered him, he thought his one advantage was that his troops were at home in the open filed while the rebels were not. He placed two companies in the open in the southwest corner of the board, and one hidden in the woods at the south edge near the center to ambush flankers. The main brigade under Ferguson had orders to use the bayonet if the enemy came close to short range, otherwise to skirmish with them in open, while those in ambuscade were told not to fire but rely exclusively on cold steel.
The Patriots enter the board at the far end, slogging through the many obstacles, scouting as they went to avoid ambush. The companies in the Plantation didn't show themselves, but were far from the action. They had hoped the British would try to storm the building but it never happened.
The wily Rebels separated a few platoons to act as scouts on hopes of finding or spring any ambuscades, but found nothing. When they finally closed on Ferguson's men, they couldn't seem to get organized to allow numbers to bear due to the close terrain. Then the American Volunteers let fly with some impressive volleys that broke up the Patriot attack causing a number of casualties including some good officers. Still, the Loyalists were being cornered and close to being cut off by the Plantation garrison that came out and tried to flank them.
Unfortunately their scouts did a lousy job and were themselves ambushed by the Legionnaires who crushed them and drove them into a nearby company that fled in rout, facing a fear test with faltering modifiers. They broke and ran back down the road to the plantation.
Having lost the equivalent of a company and with their troops badly out of position, the Rebels figured they should high-tail it back to North Carolina before they really got a pasting. In the retreat a platoon or two of the Fairfield militia were captured. A complete victory for the British.
As a result, the district went from cowed for the Patriots to cowed for the Loyalists. The retiring force suffers dissension, so they would need to rest and reorganize before acting again or risk numerous disadvantages. This may give Ferguson the time he needs to start administering the oath of allegiance in the north and switch some areas to Friendly instead of just cowed.
* * *
Turn 3-4
With the defeat of the Rebel attack on Henderson's Plantation, the Loyalists had a free hand. The retreating force had to recover from dissension to be effective; the Partisans raising Cain in the south were demoralized by now, due to lack of supply. Random events had Patrick Ferguson called away to Camden, leaving the capable De Peyster in command. The weather continues fine (Bad weather makes everything harder to do; two straight turns of it makes fords impassable).
Turn three had the Patriots hiding in North Carolina (Patriot Off Board Zone) rebuilding, gathering supplies (through "requisition" dispatches. The Loyalists tried raising troops and cowing a few districts, but failed at everything. The board looked identical to the turn before!
Turn four was different. The Partisans ran back to North Carolina, right past De Peyster's American Volunteers and British Legionnaires, who had vigilance orders. Being small fry the British let them go, as they figured there was bigger game about. They were right.
The troops at Prince's Fort marched to Lawson's Fork and Administered the Oath of Loyalty, which the country folk took. The district changed from neutral to "Friendly" to the King! Then a Rebel force crossed onto the board at King's Mountain, heading to Williamson's Plantation. De Peyster could have intercepted them, but didn't like the terrain- they gambled that they would move on, and sure enough were heading to Levi's Mill, where they were successfully intercepted.
This put a halt to play, since we figured there are enough troops for a good tabletop engagement. There were still dispatches that need to be resolved for the turn to end.
YES! I love campaign games...now I get to stare at the map and stew for a few days...
I am stunned at how fast the game plays. We did two turns (using Skype, believe it or not) in about 20 minutes.
Turn 4 Board
* * *
The Battle of Lonesome Creek
In the middle of turn four of our campaign, a Patriot force was intercepted by Abraham De Peyster's force of Loyalist light infantry. They knew the composition of the Loyalists, but the Crown forces had no idea who these troops trying to penetrate their lines were.
The Levi's Mills board is quite constricted, so both sides agree to try another board. Two were randomly picked; rolling to see who "the Best Shifter" was; De Peyster had the choice of board to stage the interception. He chose "Lonesome Creek", which had high ground on both sides, lots of open terrain, while one side was covered in light woods. At that point we had to check the type of battle that could be fought. I was informed that the enemy commander was a Partisan, giving him a modifier to the roll. He rolled a one, modified to two, while I rolled a six! This meant I doubled him and was able to not only *choose* the type of battle, but from a list of "Advantaged" scenarios. I chose "Surprise".
In this scenario the enemy sets up with no company closer than six inches from another. Further, they are considered "exhausted", meaning that if they fail a fear test by two they are dispersed, and removed from play without a chance to rally. Even though I hadn't scouted the force I assumed this would be an easy victory.
The Patriots set up three companies very close to their board edge, spread out, and I set my four companies (three Tory Light Infantry, the American Volunteers and British Legion, and a South Carolina Militia unit) in the center of the board as close to the enemy as I could. I "Steady on" orders with a plan to switch to "See the blighters off" when I got to close range.
I deployed one unit in Skirmish order to hold off two of his companies (of as yet unknown unit types), and concentrated on crushing the last unit with a bayonet charge by the American Legion. I started the advance and came under intense long range fire which my men had orders not to return. Closing quick, the casualties started to mount, as accurate fire laid some terror markers and two lost platoons from my best, irreplaceable units. On top of that, two officers were killed, and my skirmishers wilted, routing back to their start line!
Turn 7 Board
Turn 8 Board
Turn 6 & 7
Madness.
Turn 6 saw the British consolidating and the Patriots expanding the scope of the fighting. Now that the Tennesseans and the Georgians are in play, there is a parity in strength, further aided by furious recruiting in North Carolina.
The King's men continue to fail some of the easiest rolls, hamstringing their ability to keep up the momentum of gaining the allegiance of the border region. Recruiting has also been a disaster. Three of their forces began the turn with dissension, making them less effective until it is quelled.
While they stumbled about, the Rebels struck. Riding down through their favorite route (Hill's Iron Works, White Oak, Winnesborough) and on to cow the Broad River area, making a pocket of fear in the Loyalist heartland, threatening supply. Then a bigger shock. A force marched down to the Fair Forest District, behind enemy lines. From here they could hit any target and sever the supply chain. Then the last surprise- Thomas Sumter made a showing in an attack on Rocky Mount (random event)! The only hope he really had was to catch the garrison at disadvantage in pre-battle resolution, but he narrowly failed and was driven away from the fortifications. This lifted British spirits, canceling the dissensions in the detachment!
That's how it looked at the beginning of turn seven. The Loyalists planned a counterattack. Again, subordinates failed to act, but they did get to march first. The victorious Rocky Mount detachment marched over to Fair Forest, not knowing what the Patriot force was composed of (again, failed reconnoiter rolls).
It turns out it was a beehive of Georgians (under Clark)! A small encounter resolution had to be made. They had Rangers and Riflemen, the British had the only artillery west of the Broad and some tough soldiers (though outnumbered slightly). Both sides rolled- a significant victory for the Loyalists under Col. Turnbull! An entire enemy company wiped out, the rest in retreat to their newly cowed district of Broad River. Worse for the Rebels, all of the supplies, carefully gathered over turns in North Carolina and mean to support them for weeks falls into enemy hands! What a relief!
It wasn't over yet, as a gander at the map in the files section would show. Another large force of men, this time the Tennesseans, marched onto the board, this time past King's Mountain and straight into Henderson's Plantation. In the battle that followed there were few casualties, but the Loyalists were dislodged, falling back to Fair Forest.
What a turn. It's anyone's game now. With Rebels on the board and not in North Carolina, they face sudden attacks and a difficult time consolidating. However they now have access to the whole board, and can play havoc with supplies from Camden and Charleston. Even Ninety-Six isn't safe.
Stay tuned.
Letter to the Georgian Refugees in Broad River
Sir,
In the late engagement of Fair Forest your army was defeated- bag & baggage lost, numerous men killed and others prisoner. The people of the region have thrown off the yolk of fear put upon them by your rebellious soldiers. You have no friends and are quite cut off.
Therefore in the name of His Majesty, George, my King and yours, I demand your immediate surrender without condition. You will have good quarter, excepting any deserters within your ranks.
Use me well while the opportunity to do so remains.
I have the honour etc,
Col. Turnbull,
Rocky Mount
Sir,
I thank you for your gallant letter, but I am afraid that I must decline your offer. You must have had little dealings with the men of Georgia, to think that a slight downturn in their fortunes would dissuade them from the virtuous path of Liberty. Perhaps you have been so long on bended knee before a tyrant that you think that it is the normal position for all men to hold, but you will learn otherwise if you linger in the South for very long.
Even so, your kind gesture merits another in return- therefore, since you speak in the king's name, I am willing to accept terms for his surrender of our beloved Savannah to Patriot forces at your soonest convenience.
With all honor and affection, I remain-
Col. Elijah Clarke
* * *
Turn 8 to the bitter end
The British had lost the initiative in turns 6 & 7, as well as some battles and some territory. Two Patriot forces were now occupying districts on the board, having left the safety of North Carolina to carry the war to the enemy. One detachment under Elijah Clarke (composed of his Georgian Refugee Militia) encamped in Broad River was in poor shape, having lost their enormous supply cache in a fight with Col. Turnbull of Rocky Mount. The Tennesseans (Over Mountain Men) were basking in the glow of victory at Henderson's Plantation, breaking by picket line of districts set up to intercept anyone coming out of North Carolina.
The Loyalists went first, with a vengeance. Turnbull again marched on the Georgians and crushed them in a quick engagement, chasing them off to Chestnut Ford on the Broad, clearing the southeast from danger. The Rebels in Fair Forest skirmished with Cruger and his militiamen in William's Plantation, shooting up Bryant's NC Refugees and pillaging the district before heading home.
This time they didn't get away with it. Cpt. Dunlop and his detachment of Dragoons, Rangers and Light Infantry met them as they came back to camp. We resolved it with the small encounter rules. Rolling and adding the modifiers, we ended up with a tie- the rules didn't cover that. The British were for calling it a draw and marching back to Prince's Fort, but Col. Shelby demanded a second throw, hoping to break up the Crown's resurgence. It backfired- Dunlop mopped the floor with the Tennesseans even though outnumbered 2:1, causing them to retire to Cedar Springs.
In the words of my opponent, "this was a bad turn for the Rebels". Their two best detachments are demoralized and out of position. The British are better placed than ever, with seven districts in the north half of the board Friendly or Cowed. They need six for a victory, ten for a major victory. There are four turns left until we start rolling for the game to end (variable sudden death).
Oh, the drama!
When last we left you (turn 8), the Rebels were on the run. Both the Georgians and the Tennesseans had suffered defeats at the hands of the Loyalists and were out of position, as well as demoralized. In turn 9 they high-tailed it back to North Carolina, while the King's Men reorganized their lines and recruited some more militia.
With the time possibly running out (variable game end), things looked good for the Crown. They had seven districts near the border either cowed or friendly, needing only six for victory (ten for Major Victory). Recruitment was coming along.
The Rebels had to turn things around with a bold stroke, but how? Their strongest detachments were recovering from demoralization. Most supplies had been captured by the enemy. All that remained was the Commandant's detachment, composed of militia but including a troop of Dragoons. To tear open the British line, they decided to hit Henderson's Plantation AGAIN.
The hope was to break the supply line to William's and Thickety Fort, forcing a withdrawal. A bold plan! However the board had changed the turn before. Cedar Springs was occupied by Dunlap with his Rangers and two companies of the British Legion supported by militia....
When they struck (turn 10), they marched through the Cowpens and into Cedar Springs, thinking it was a small force of militia. An interception could have been attempted, but wasn't, allowing the Rebels a sigh of relief. This was not as fortunate as it sounded at the time. Having fought over the Plantation enough times, we drew two cards and the Loyalists got to choose, and picked Clifton's Stables. It was now that the Patriots realized their dilemma- if they failed, it would be nigh impossible to get back to North Carolina.
In the most important engagement of the game, the Rebels were defeated, and their Commandant killed! Losses were moderate, but retreating back through Cedar Springs they were intercepted. Unable to escape, they went into the bag.
This was a blow that my opponent could not recover from. The sponge was thrown in. South Carolina belonged to the Crown! The icing on the cake? Patrick Ferguson came back from Camden just in time to lead the Loyalist detachment in the final battle! Just in time for him to lead the North Carolina campaign next month (where he would come to grief at King's Mountain).
With the end of the campaign, we're readying the final package for release. Some graphic and rules touch ups are all that remain.
You saw it here first!
TPC
* * *
Turn 5
A juggernaut until now, the Loyalist cause had its worst turn ever. First, the weather turned bad, making every dispatch harder to execute. This favored the Patriots since ALL activity originating in the Patriot Off-Board zone (where they are all hiding) is "mild duty" (5+ on 2d6) to successfully carry out. The rain turns it into "troublesome duty" (7+ on 2D6). So, the Rocky Mount garrison failed to raise recruits, and the Princes Fort detachment failed to Cow the good people of Spartanburg. The Crown did have one success, an ace up its sleeve; the detachment that occupied William's Plantation was led by none other than Ban Tarleton and a few companies of the dreaded British Legion.
They had arrived by random event, and I get to keep them for a little while (Thank you Cornwallis!!!). They successfully carried out a "Vigilance" dispatch, even in the pouring rain. Since "Bloody Ban" has a "Hard Riding" officer characteristic and his force is all mounted, interception is likely for any Rebels that think to sneak by. Thanks to the fog of war, nobody knew he was there. The enemy just figured it was some militia.
Then came the horsemen. A Patriot force entered the board at Hill's Iron Works, and proceeded to White Oak where they were intercepted. Not wanting to slow down the campaign, we decided to resolve the engagement with the Small Encounter rules (not on the tabletop). Unlike a tabletop battle where forces remain hidden unless reconnoitered, we had to reveal who was there to resolve the engagement.
The Rebels were in fact the Tennesseans, the Over the Mountain Men! To the shock and horror of both players they faced the best the enemy had with their own best troops! Oh how we wanted to play it on the tabletop, but the playtest comes first!
We tallied the dominance points and rolled, and I won't lie to you, I was sweating. Then it happened-the Legion was defeated! A wave of nausea came over the Royal commander (me). The loss in men was small (three platoons), but the blow to morale was high?. Tarleton retired to William's in shame, his detachment now afflicted with dissention.
The jubilant Patriots carried out their dispatch, to "Insult" the Loyalist outpost at Broad River. This was no contest- the single company of South Carolina Loyalists went into the bag, including their officer Lt. Col. Carey. The defeat infected the Rocky Mount with dissention as well.
The net result of the turn? Two of the main Royal detachments suffer from dissention, making dispatches harder to carry out while making them more brittle in an engagement. Nothing else was accomplished by them. They will have to spend the next turn "quelling dissention".
The initiative has passed to the Rebels.
* * *
Still confident of victory, I started shooting and causing some casualties of my own. Just before getting into charge reach of my target, the unthinkable happened- a company of Rebel riflemen appeared near the edge of the light woods, right on my flank! I had to turn my Volunteers to face them, breaking up my attack. When the shooting started, the riflemen decimated their opponents, who could not go in with the bayonets thanks to all the casualties.
Folding on two flanks, I had no choice but press on with the original plan using my reserve company of the British Legion. They braved enemy fire unscathed and fired on the enemy company in the center of their line. They were devastated, losing a platoon and then taking two terror markers, also losing their officer. The new one picked was Simpson, a minus two morale detriment. When the charge came the unit needed a four to pass, and rolled a three. In the hand to hand battle they miraculous escaped with a "retire" result, and two more terror. The frustrated Legionnaires rushed them again and again they stood, rolling a four! This time the bayonets told and the unit lost two platoons and ran off the board.
Pushed past their flight number, the Patriots rolled well and did not flee, but they decided to get off while they could. The battle was over. In the pursuit that followed the Loyalists took two more platoons prisoner. The final summary had the Patriot lose six platoons, an entire company, and fail in their mission (which was to Administer Oath in a district in the south). It was a Crown victory, but the cost was high- four platoons of Elite Tory Light Infantry. From the prisoners it was learned that the Patriot forces were Georgian Refugees under Clarke- tough customers. Not knowing gave the Loyalists the impression that these were more militia like those they defeated so easily at Henderson's Plantation. Further, it never occurred to them that there might have been anyone in the woods- they just assumed the whole enemy force was in front of them. Before this battle, the Patriots feared these Tories as a kind of supermen, while the Tories despised their enemy. Now, the Patriots are looking forward to getting at this detachment as soon as possible, while the Tories are thinking they don't want to lose any more men by risking them in battle..(I'm still in a state of disbelief! What will Major Ferguson say when he gets back!?)
With the retreat of the Georgians, the rest of turn 4 was quiet. The only real activity was a detachment from the Hanging Rock garrison on an encamp order has taken possession of William's Plantation. While the district is still "cowed" for the enemy as far a allegiance is concerned, this new post in the north is another link in the chain sealing South Carolina for the King. It will be hard for the Patriots to not only penetrate this cordon, but once through they will not only be cut off from supply but from communication- dispatches may be captured by the numerous Royal garrisons and read, revealing planned moves!
Additional: We have just included a rule that has prisoners revealing info about their garrisons.