For whosoever commands the sea commands the trade; whosoever commands the trade of the world commands the riches of the world, and consequently the world itself
- Sir Walter Raleigh
Welcome friend, to the page that asks, "Rome or Geneva, or Wittenburg"?
---------------------------
Contact us
The Perfect Captain
---------------------------
A complete system of warfare for 16th Century Europe
Including Large & Small scale land warfare modules, one for
Naval warfare, a Campaign, a Siege Game, and piracy in the Caribbean!
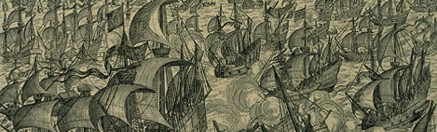
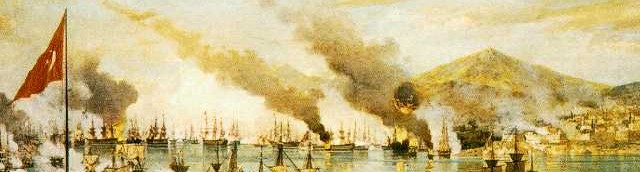
Spanish Fury, Sail!
Our game of naval warfare of the late Sixteenth century, covering the Armada as well as Lepanto, enabling players to fight on the sea from Cyprus to the Baltic.
Don't forget, Sail! is part of the Spanish Fury system- that means it can be used with SF:Voyage (Caribbean Campaign) and even SF:Siege!
For the Galley Warfare Supplement, click on the Lanterna button (right)
What's it about?
We were after something more than fast play, but much less than complexity. These rules were originally meant for each model to represent more than one ship, and you can still play it that way. However at one-to-one it works best. As is our way, we wanted players to feel like they were playing their favorite navies. The tactics of one fleet will not work for another.
The New Economy
The sixteenth century saw a great economic shift in Europe, mostly brought about by the opening of new products and markets of the New World and the Pacific. The growing middle class' desire for exotic goods made the Italian city states rich as carriers of trade from the east. Spices, silks and other treasures were dragged overland from China to Levantine ports, for distrubution in Europe at such commercial centers as Barcelona and Antwerp. The prices were exorbitant and those involved in the trade were soon wielding
political power through loans to impoverished Kings and Princes.All of this changed with the voyages of men such as Columbus, Cabot, and Magellan in and around the Americas.
Earlier, the Captains of Portugal's Henry the Navigator began the African trade. Now it was governments as much as merchants who were controlling the flow of the new wealth, and began to increasingly depend on it. The rivalry was serious, as so much was at stake. Spanish, Portugese, English and French expeditions were sent to explore possibilities and stake claims. While the French and the English were half hearted at best, being distracted in Europe, the Spanish and Portugese divided the world between them, even ratifying
this reality with the Pope by the treaty of Tordesillas, giving Portugal Brazil, Africa and the Pacific, while Spain took the rest. After the Spanish conquest of Portugal in 1580 they controlled the greatest empire in history.
When a single ship could carry wealth equal to the revenues of a small country in its holds, even fishermen turned their hands to piracy. Soon the great trading empires began to convoy their ships and even build warships to guarantee their safety. Government began to fund private actions against trade by issuing licenses to shipowners. These "Privateers" soon infested known trade routes and sought to discover secret ones. Often using flimsy excuses of "reprisals" for unfair trade practices, government owned warships
were used to sweep the rich shipping lanes of anything that could be converted to cash, and many bars of Spanish silver went to pay for troops and ships that would eventually bring the Spanish empire to its knees. The Spanish/Portugese warships, built mainly for defense, led other nations to build navies in self-defense, out of fear.
The growth of the middle class also lead to a greater degree of centralization- the educated sons of merchants became a bureaucracy, which led to more effecient taxation. This enabled government to begin to invest militarily in projects of a less limited nature than before. Spain's standing army was well beyond 100,000 men; fighting men at that. The Tudors, starting with the fortune saved by Henry VII could bring a permanent fleet into being, so that by the 1580's it was unrivalled in the world. This prompted a more extensive building program in Portugal and Spain. Even France tried a hand at putting a standing fleet together under Francis I, but this came to nothing through the negligence of his successors and the civil wars.
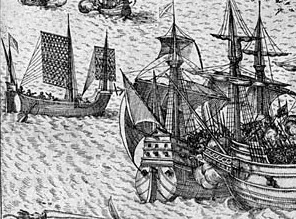
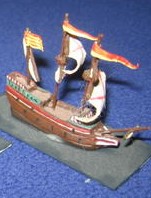
The New Design
Now that ships were being built regularly for military purposes, designs began to reflect this. Carrying capacity was no longer the main concern. The deeper, rounder Carrack made way for the Galleon- longer, narrower, faster, even with different sail configurations. These ships could remain on station for long periods, and could handle difficult weather to a greater degree than previous merchant ships. They still retained high fore and aftercastles to give advantages in boarding actions.
The New Tactics
The shape of ships was also changing to reflect new technologies and tactics. Relatively Light brass cannon of large caliber were not only available on land. These were mounted on ships, and now had the power to smash timbers to matchwood. Mid-century military thinkers still believed that the principle naval tactic should revolve around boarding, as it was in the more-common galley warfare of the Mediterranean theatre. Guns added the new dimension of softening up the target before boarding, but were not considered sufficiently powerful enough to sink the great carracks of the day. It was the English who began to standardize types of guns and ammunition on the Queens ships, who introduced truck-carriages which enabled them to fire and load faster that their opponents. John Hawkins, secretary of the Navy in the 1570's and 80's revolutionized warfare with his race-built Galleons. Lower, faster, more manouvrable and better armed that anything else afloat, they were designed for gun battles, not boarding. It was these ships and tactics that defeated the "Invincible" Armada in 1588.
After the Armada
The Armada campaign and subsequent actions by the English navy convinced every nation, even Spain, that the future lay with gunnery and nimble ships. The designs of the 1590's and into the 17th century show how complete the evolution was. Every maritime nation that could afford it began a military ship-building program, and by the middle of the century impressed merchant ships were an anachronism. Modern navies were born.

Which nations are represented?
We have the Spanish/Portugese, English and Dutch navies, as well as Turkish and Venetian. French and Hansards are provided for to a lesser extent. Other navies, particularly Danish and Swedish, will be the subjects of later supplements.
How many ships can you play a side?
You can have from one ship per side up to forty, and still have a good time. As you'll see below, the game is intriguingly uncomplicated without being "fast play", meaning no engagement is too small, and the larger battles can still be played without overly bogging down. We suggest each player control no more than 15-20 ships each, so with several players per side (and a big enough board) you could refight the whole Armada campaign!
Does it take long to play?
We finished a game with 15 ships per side in less than 90 minutes. Yet we do not consider these rules "fast play" (in other words, sacrificing too much realism for speed)
Do I have to write anything down?
Now you know how the Captain feels about record keeping..... Pen and paper are not required.
Movement
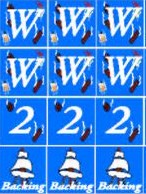
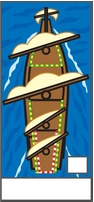
The real killer in these games is simulating sails and wind. Gunnery is easy. Boarding is easy. Naval rules rise and fall on how movement works. Our system is highly visual- there's no checking sail settings, wind magnitude and direction on separate, complicated, text-based tables. Now everything is colour coded and and simple. Let's look at this Ship card for example:
Take a look at the circle near the top. The whole card should be mounted on heavier stock after printing, while the white part in the center with the little ships diagram is supposed to be cut out. During play, to find out everything you need to know about the ship, lay the card over the model on the tabletop (if there's room) or hold it above it for a second. Your done! Everything you need to know about moving your ship has been figured out!
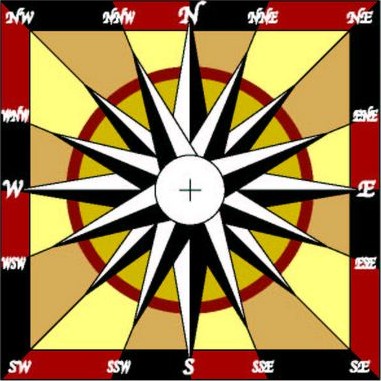
Checking the wind direction in relation to your bow will tell you if your ship is "Beating" (moving close to the wind, in the YELLOW range), "Running" (wind behind you, but not in the optimum position, in the BLUE range), or in the "Quarter Reach" (optimum position for catching the most wind, and hence the fastest movement, in the GREEN range). Once you've got the right colour, you suddenly have a ruler on the sides of the card telling you how far you will move! If you are in the GREEN range, knowing the winds are currently "Fresh" in this battle, you see how far you must move. Also shown are up to four graduations showing the current damage level (0-4) of your ship (if any), marked by one of the Perfect Captain's spiffy little counters beside your ship.
It should take you above 5 seconds to know how far your ship will move in a turn. Since each ship is part of a division (several ships brigaded together), our station keeping rules will probably require you to only check one ship per division (maximum of about 5 divisions in play). That makes a turn go by pretty quick!

You can use miniatures or the paper counters provided
Manouvre
Each turn is broken down into two "legs" or moves. Depending on the quality of the crew (all ships of each fleet have the same quality each scenario) each ship will have to make its turn either at the end of each leg (inexperienced crews) or at the beginning of each leg (experienced). Note that experienced crews will always see which way the enemy is planning to move each turn. Where crews are the same quality, the fleets who's
commanders strategy rating is high than the others (modified by a die roll) will have the advantage.
Gunnery and Damage
Here's another spot where rules can fall to the ground. Gunnery charts shouldn't be too hard to do. We've put the ships gunnery rating at the two ranges, long and short, on the Ship card itself. Gunnery rating at a particular range targets structure rating subtracted for the fire column on the gunnery chart. No problem, very easy. Damage can be complicated in some games. Ships in our system start with a damage rating of zero, but can be knocked down level by level (1-4) until reduced to a useless Hulk. Everything on a ship degrades on damaged ships. Notice on the card above, even the ship's structure drops. This is shown, as mentioned above, with a discreet damage counter placed behind the ship.
Grappling and Boarding
Boarding! Everyone wants to do it, whether they admit it or not! The Spaniards certainly wanted to do it in 1588, but couldn't. In our rules, grappling an opponent who doesn't want to be grappled isn't easy, especially if you are in a lumbering, crank ship, and he isn't. Your ship's handling number tells you how nimble your ship is. The better handling, the easier to escape or bring on a boarding action. Once aboard, however, its the most and toughest marines that are going to carry the day, capturing ships and officers, and planting prize crews!
Terrain??!?!
Yes, there is often terrain which effects sea battles. Often it is a land mass such as a coast or an island. It can also be shallows and reefs. Further, islands and ports often had castles, forts, and gun platforms defending them, and a large number of famous battles of this period (both Cadiz invasions) involved running the gauntlet of shore defenses.
Command
This period was famous for great naval figures, but not as often for their great battle tactics as later periods would be, with the likes of Nelson. However, plans were often laid before battle which dictated the way battle would be fought. Our rules brigade ships together in divisions. These divisions are commanded by Captains, with the fleet commanded by an Admiral. Although the ability to change orders is limited, these officers still have an important part to play.
DOWNLOAD EXTRAS?
The sidebar (right) has Lanterna (Mediterranean Galley Warfare supplement), little flags to tag your ships, a set of scenarios for the Portuguese in East Africa as well as some new ships for the Caribbean! Also, when you download the rules there is a historical breakdown of the Navies and their tactics.

*Introductory Scenario 1*
Breaking the Blockade:
Sluys, 26 May 1601
Spinola's campaigns in the Channel had been cause of countless headaches to the English and Dutch governments. No expense had been spared to trap him and his tiny fleet of Galleys and finish them off, all to no avail. However, Spinola's superiors did not have much use for him, not being as far sighted. Determined to prove his value or die trying, he has decided to sally out of port and break the blockade of Sluys. With only a handful of ships, de Moor was able to defeat the Galleys and deprive Spinola of his life.
-----------------------------------
The Spanish
Frederico Spinola (Strategy 6/Fierce),
with up to two Captains
Available Forces:
8x Galleys
4x Galliots
Quality:
Experienced Crews
Experienced Marines
------------------------------------
The Dutch
Admiral Joost de Moor (Strategy 4/Fierce),
with up to one Captain
Available Forces:
1x Armed Merchants
1x Crompster
2x Galleys
Quality:
Experienced Crews
Inexperienced Marines
-------------------------------------
Setup
The recommended board should be at least 4' x 4', non-scrolling, with shallows extending from the Spanish Board edge out about 8". There are no shore defenses. The Spanish should begin in the shallows, (southern board edge) while the Dutch setup within 12" of any other board edge. The Dutch set up first. The wind is Fresh and blowing from the west.
Victory Conditions
The Spanish win by destroying the Dutch fleet or by chasing it off the board by turn 30. Dutch ships which exit the board may not return. The Dutch win by killing Spinola or remaining on the board until nightfall (reinforcements were expected hourly). The game last 30 turns.
*****************************************************************************
*Introductory Scenario 2*
Day One, July 31, 1588
The Armada has just entered the channel, and is heading east. Having got out of Plymouth, the English are about to test the mettle of their great enemy. Sniping at both flanks of the tight Armada formation at the same time, hoping to break it up, The English had not yet decided what the optimum engagement range was, and showed signs of hesitation. The Armada's Vice-Admiral, Don Juan de Recalde, decided to make it easy for them. Breaking
formation, he fell behind his division, hoping to tempt the nimble English into a boarding action, which he hoped would trap them until reinforcements arrived.
The English Captains refused the offer. Instead, they pounded Recalde at long range. Unfortunately for them they were too far away to register any significant hits. The score for Day One: a draw.
-----------------------------------------------
The English
Sir Francis Drake, Vice-Admiral (Strategy 6/Fierce)
Sir John Hawkins (Strategy 4/-)
Martin Frobisher (Strategy 3/-)
Available Forces:
1x Race-Built Galleon (Revenge)
1x Large Race-Built Galleon (Victory)
1x English Galleons (Triumph)
Quality:
Experienced Crews
Inexperienced Marines
-----------------------------------------------
The Spanish
Don Juan de Recalde, Vice-Admiral
(Strategy 5/Fierce)
Available Forces:
1x Portugese Galleon (San Juan de Portugal)
Quality:
Experienced Crew
Experienced Marines
Note: The San Juan de Portugal is considered to be carrying an invasion force;
therefore all its Marine factors are considered doubled.
-----------------------------------------------
Setup
The recommended board should be at least 4' x 4', scrolling. The Spaniard should setup in the exact center of the board, while the English setup anywhere at least 12" away from it on the western half of the board. The wind is Fresh and blowing from the northeast.
Victory Conditions
The English win by inflicting at least 3 damage points on the San Juan, or by reducing it to a hulk (catastrophe). The Spanish win by avoiding the English victory conditions or by inflicting at least 2 damage factors total to the English fleet, or if they are grappled to an English ship by the end of the scenario. The Game length is 12 turns, at which point massive Spanish reinforcements will arrive, and the English will immediately disengage.
***************************************************************************
*Introductory Scenario 3*
The Battle of Reimerswaal
January 29, 1574
Walcherin Island was the key to the Scheldt, and the Scheldt the key to Zealand. The Spanish held the town of Middelburg on the island and had been under siege for one and a half years by forces of the States General. The island cut the Dutch possessions on the coast in half, and both sides recognized a show down was imminent. The garrison was reduced to eating cats and dogs. Don Luis Requesens convinced Julian Romero, a Spanish commander of note (though without naval experience), to lead a relief fleet out of Bergen-op-Zoom to break the blockade and resupply the town. The Dutch fleet, under the famous Louis Boisot waited for the Spaniards in the mouth of the estuary.
Half of the Spanish Fleet was unable to reach the scene of the battle in time, but the Spaniards still had a numerical edge. This could not overcome the fanaticism of the Dutch however, who were so desperate to come to grips that they scarcely fired a shot, choosing to board as soon as possible. They were completely victorious, smashing the enemy fleet and capturing de Glimes, while Romero was forced to swim for it. The defeat of the fleet was the defeat of the garrison of Middelburg, which surrendered shortly after.
-----------------------------------------------
The Dutch
Louis Boisot, Admiral of Zealand (Strategy 5/Fierce) [Admiral]
Joos de Moor (Strategy 4/Fierce)
Klaaf Klaafzoon (Strategy 3/-)
up to two other Captains
Available Forces:
8x Armed Merchants
6x Small Armed Merchants
6x Crompsters
6x Pinnaces
Quality:
Experienced Crews
Experienced Marines
-----------------------------------------------
The Spanish
Julian Romero (Strategy 2/-) [Admiral]
Admirale De Glimes (Strategy 3/-)
up to two other Captains
Available Forces:
6x Armed Merchants
20x Small Armed Merchants
8x Pinnaces
4x Galliots
Quality:
Inexperienced Crews
Inxperienced Marines*
*Note that while Spanish Marines are usually Experienced, morale was low, and compared
to the Dutch, they were unmotivated.
-----------------------------------------------
Setup
The recommended board should be at least 8' x 4', non-scrolling, with shallows extending from the Narrow sides of the board out about 4". There are no shore defenses. The Spanish should setup within 2' of the southern, end of the board, while the Dutch setup within 4' of the northern board edge. The Dutch set up first. The wind is Fresh and blowing from the northwest.
Victory Conditions
The Spanish win by exiting 20 ships of any type off of the northern board edge. The Dutch win by capturing, sinking or reducing to Hulks at least 15 Spanish ships. The game last 30 turns.
***************************************************************************
After Calais
8 August, 1588
After all the heavy fighting in the channel, the Armada was only a few miles away from Parma at Dunkirk. The English were out of time. The Armada had to be destroyed as a fighting force, or else face Spaniards on English soil. While they lay anchored off Calais, exchanging messages with Parma (begging for ammunition, among other requests), Medina Sidonia saw his great fear realised: Fireships were bearing down upon his fleet.
Unable to avoid them safely, he ordered the fleet to slip their cables and make a run for it. While no ships were lost to fire, they were now scattered, facing four squadrons of English ships in perfect order.
The English came on with a vengeance. Closing to point blank range, their cannonade nearly wrecked the few ships Medina Sidonia could gather around him to cover the stragglers. However, for the first time, Spanish gunnery began to tell on the English. Both sides were receiving casualties, but it was much worse for the Spaniards. After this engagement, several of their ships sunk or ran aground, while the English lost not a ship.
-----------------------------------------------
The English
Sir John Hawkins (Strategy 4/-) [Admiral]
Martin Frobisher (Strategy 3/-)
Sir William Winter (Strategy 5/-)
Available Forces:
1x Large Race-Built Galleon (Victory) [Hawkins]
1x English Galleon (Triumph) [Frobisher]
1x Race-Built Galleon (Vanguard) [Winter]
1x English Galleon (White Bear)
1x Race-Built Galleon (Non Pareil)
1x Race-Built Galleon (Rainbow)
1x English Armed Merchant (Swallow)
1x English Armed Merchant (Swiftsure)
Quality:
Experienced Crews
Inexperienced Marines
-----------------------------------------------
The Spanish
The Duke of Medina Sidonia, Admiral (Strategy 4/-) [Admiral]
Don Juan de Recalde, Vice-Admiral (Strategy 5/Fierce)
Miguel de Oquendo, (Strategy 4/-)
Martin de Bertendona, (Strategy 3/-)
Available Forces:
1x Portugese Galleon (San Martin) [Medina Sidonia] Damage level 2
1x Portugese Galleon (San Juan de Portugal) [Recalde] Damage level 1
1x Portugese Galleon (Florencia) [Oquendo]
1x Spanish Galleon (La Regazona) [Betrendona]
1x Portugese Galleon (San Mateo)
1x Spanish Armed Merchant (Gran Grin)
1x Spanish Galleon (Santa Ana)
Quality:
Inexperienced Crews
Experienced Marines
Note: All Spanish ships are considered to be carrying an invasion force;
therefore all its Marine factors are considered doubled.
-----------------------------------------------
Setup
The recommended board should be at least 8' x 4', scrolling. The San Martin & San Juan should setup in the exact center of the board. The rest of the Spanish fleet should setup at the 12" away from either ship to the east. The English setup anywhere at least 8" away from the center of the board, on the western half. The wind is Fresh and blowing from the Southwest.
Victory Conditions
The English win by inflicting at least fifteen damage points or by reducing at least three ships to a hulks. The Spanish win by avoiding the English victory conditions or by inflicting at least nine damage factors to the English fleet. Captured ships count as six damage points. The Game length is 25 turns.