My gracious liege, this too much lenity and harmful pity must be laid aside.
To whom do lions cast their gentle looks? Not to the beast that would usurp their den. Whose hand is that the forest bear doth lick? Not his that spoils her young before her face.
Lord Clifford, Henry VI Part III
Welcome friend, to the page that asks, "York or Lancaster" (or Tudor) ?
---------------------------
Contact us
The Perfect Captain
---------------------------
THE WARS OF THE ROSES are ON!
Between 1450 and 1490 direct usurpation was the rule rather than the exception. Around a half dozen men claimed the crown of England-Henry Holland, Richard of York, Lambert Simnel and Perkin Warbeck failed. Edward Earl of March, Richard Duke of Gloucester and Henry Tudor succeeded. Henry of Lancaster possessed it twice, while his son was dispossessed once.
Start reading Shakespeare!
If you want to enjoy this period, you really need to pick a side and start getting REALLY partisan, even obnoxiously so! There's no better place to start than Henry VI parts 1, 2 & 3! There you'll learn whether you are a Yorkist, a Lancastrian, or a supporter of one of the noble houses- proud Percy, nefarious Neville, slippery Stanley....it seems everyone had a grudge against someone! Aside from endless litigation, some families tried to gain ascendency through low level warfare and even assassination.
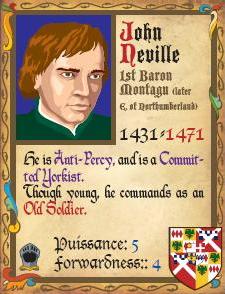
John Neville, son of Salisbury, brother of Warwick- loyal Yorkist, or just out for his family? No one is really sure...he was killed at Barnet fighting for Lancaster!
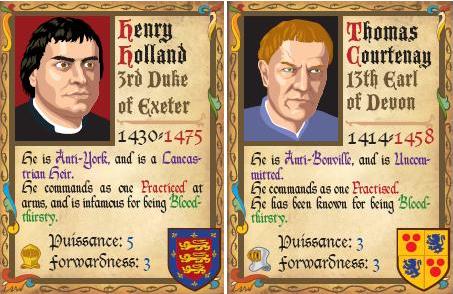
Two shifty, bloodthirsty dynasts who nobody really trusted. The gold standard of Noble behavior in this period.
Scrope? What did HE ever do? More than you, friend!
William Herbert- "Son of Prophesy", or just another opportunist? Either way, stout hearted in battle.
But what is the game like?
It is my opinion that this is one of our best campaign games. We managed to work in all kinds of period flavour while making the game easy and playable, in a system that brings a historical result. The decisions are agonizing, but play moves very quickly, and with most scenarios only a few turns long, you could easily get two into one game night! You can check the replays below to see what I mean.
Blore Heath 1459 scenario
OK, we decided to play another big scenario to test the WotR campaign. This time we picked the Blore Heath 1459 scenario because things are happening all over the place and there are a lot of cool special rules.
A bit of background. In 1455 the Duke of York and his allies staged a coup against the court party at the battle of St. Albans, where Somerset, Percy and Clifford were all killed, and the King captured. This led to a realignment of the government with a protectorate under York holding sway. Tensions simmered amidst attempted assassinations and reconcilliations. In the end, Queen Margaret put together a new court party meant to isolate York and his supporters, leading the latter to raise the banner of revolt under the "evil councillors
avant" excuse.
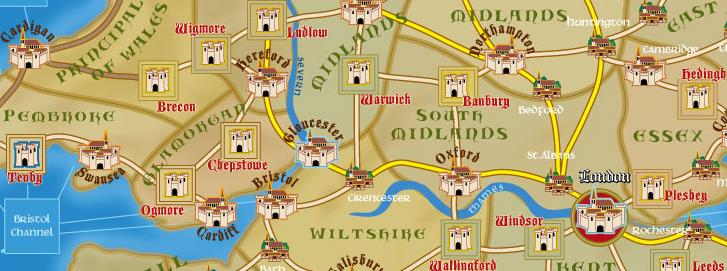
The scenario begins with York in the Welsh Marches in an entrenched camp at Ludlow. Salisbury is in the north at Middleham with Warwick in Calais awaiting fair winds to return. Several other magnates are either at these concentrations or making up their minds, such as Grey of Powis, Barons Clinton and Herbert.
The Lancastrians hold the midlands with forces under Lord Audley at Coventry and Buckingham with the King at Fotheringay. Somerset (Henry, son of the slain Edmund) and Courtnay are in Dorset. Jasper Tudor, the Earl of Northumberland and his brother Egremont, and Ralph Neville are inactive in their ancestral homes. William Stanley is also inactive, but who's side is he leaning towards? Special rules make control of this noble totally unpredictable from turn to turn as was the real Stanley, hovering near battlefields writing letters to
both sides pledging loyalty!
To win both sides must drive their opponents into exile or despair. Capturing or killing the opposing leaders makes for more decisive victory.
Play began with a free nomination for the Lancastrians, who chose to move John Touchet (Lord Audley) through the east and west midlands on a successful recruiting spree (thanks to the Queen's modifiers) . The Earl of Exeter was with him, but special rules dictate that disfavour with Margaret means he cannot command a host (force) or lead a Ward in battle. They ended the turn in Leicester (remember the map is available in the files section).
Quick note on nominations. How this works is at the start of a turn both sides choose a single friendly host (composed of magnates and their contingents of troops) to act. Both player roll a d6 and add the host commander's "forwardness" rating, the higher going first. After that host finishes its turn, both sides nominate a host again and follow the same proceedure until all hosts on the table (including the ones that were nominated but out-rolled) have acted. This means it is conceivable that one side may act with several hosts before the other side gets a chance. You never really know what to expect so you have to act judiciously.
Anyway, after nominations the next host to move was Somerset's way down south. He recruited in Dorset and Devon and force marched all the way to Oxford.
After him, Buckingham got his chance to move with the main army, cutting across the midlands to Coventry with an augmented force full of retainers, well-wishers (good quality) and Array contingents (poor quality).
Finally, the Yorkists got to move. Salisbury marched from the north down to Leeds in the West Riding of Yorkshire with a large force. The Yorkists again were able to act and attempted to bring back Warwick
with the Calais garrison, but failed. Then it was the Duke of York's turn to raise the Marches, drawing a huge army out in one turn (a few days to a week).
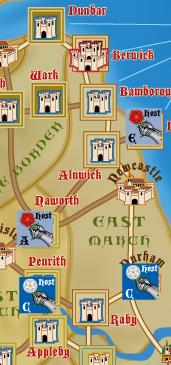
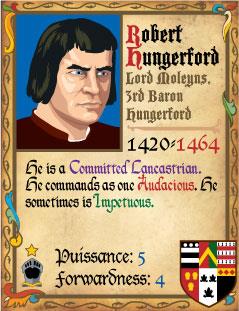
Lancaster went next successfully raising Tudor and his troops in Tenby, Wales. Using the backroads he is able to rouse his friends without York in Ludlow being able to trap him without some major repositioning and abandoning his valuable fortified camp. He ended his turn in Cardigan. Lancaster went again successfully calling up Salisbury's brother Westmorland at Raby in the East March. Lethargic, he plodded down to Appleby raising a small force, hoping to keep Salisbury honest and perhaps stop his successful recruiting.
It was then the Yorkists turn and they managed to bring Grey de Powis into Ludlow with a small force. After this the Lancastrians tried to bring on the Percys but failed. The Yorkists didn't try to raise their other inactive Lords because unlike the Lancastrians, one failure means they never get a second chance to raise them, so they
waited until a magnate of theirs with influence was in their vicinity with his modifiers. No one tried to raise Stanley. So ended the first turn.
The second turn began with a Yorkist nomination. This was a hard one. The Lancastrians were massing near Coventry. Warwick was about to arrive in London, and Salisbury with John Neville were in the north. The Duke of York was relatively safe, but for how long? He had already denuded the Marches of recruits, so was unlikely to grow larger, but he had the fortified camp. They decided to activate Salisbury, but what should he do? Reinforce York in Ludlow or cut through the Lancastrians to London? Instead, he chose to backtrack north and put an end to Westmorland's activities. He rushed straight over and with a successful force march roll he jumped the Lancastrian host.
Outnumbered 4:1 (roughly 6000 men to 1500) he would be scattered and have to flee alone, risking capture and causing a shift in campaign confidence to the Yorkists who were desperate for it (they start much less confident than the Lancastrians). Instead of attempting to evade and getting crushed, he chose personal flight before the battle- there is a smaller confidence change in this; he abandons his troops and escapes alone. There is a one third chance he will be captured but he is able to get away, immediately taking refuge in Scotland! The north belongs to Salisbury.
To make things worse for the King, Warwick lands in London and starts stirring the Kentishmen.
Now Lancaster is in trouble. They still have the Yorkists separated but it can't last. Buckingham keeps failing his nomination due to his low forwardness, and he starts to worry that York will march on him from Ludlow. It is decided that Somerset with his high forwardness will try to go next, and does. He marches over to Coventry to join with Buckingham.
Now York makes a desperate gamble. Too many red roses have gathered in Coventry. Help won't arrive in time. He breaks camp and tries to make London and Warwick but ends up in St. Albans.
This is too good a target for Buckingham. Although slow and not the best commander, he manages to pick up Touchet's host and force march to St. Albans! York accepts battle rather than evade and take the morale loss. Start counting the troops and laying them out in Wards...
We can't play this with miniatures as my house, where the group's table is located is undergoing renovations (yes, at Christmas, long story) so we use the battle resolution rules in the campaign game.
The Lancastrians set up thusly: (about 31 contingents of various kinds, about 10,000 men)
Vanward under Buckingham with Beaumont
Main under Touchet and Exeter [+1 for numbers advantage]
Rearward under Shrewsbury and Sutton (with a captain [+1]
Yorkists (around 8000 men) from memory since my opponent neglected to
leave an account before he went home!)
Vanward under York and Grey [with a gun [+1]
Main under Edward Earl of March (with a captain [+1]
Rearward under Devereaux
The Lancastrian rearward vs Yorkist van is resolved first. Adding the commanders puissance rating to a d6 plus modifiers, you must be ahead by at least 2 to win, 4 for a rout (all nobles captured). The Lancastrians win by 2 and the Yorkist van is shattered.
The two mains are next and again the Lancastrians win, by three this time! The last fight is a draw.
With two Yorkist wards in rout the last collapses and that's it for the army of the white rose. Everyone escapes except Edward who goes into the bag (he's lucky Exeter wasn't in command opposite- being of the bloodthirsty characteristic he would have murdered Edward out of hand.
With this loss the Yorkist morale plummets to a very dangerous level. All influence levels on their side drop by two making recruiting VERY difficult and movement slow. Desertion will set in every time a nominated host fails to move. Warwick doesn't have the strength to face the King, and Salisbury is too far away, and will soon face the Percys. Wales is not a refuge thanks to Tudor's quick march to capture the empty fortified camp at Ludlow. They concede, making their way to exile while the exultant Lancastrians prepare for the "Parliament of Demons" where they (historically) attainted everyone who ever even smelled a white rose.
All told, due to the escape of the principles, a Lancastrian minor victory. Nabbing the Nevilles would have made it moderate, while grabbing York would have made it decisive!
Super-fun.
TPC
Nobles drive the game
Most scenarios begin with few troops in play- a faction must use their nobles in the ancestral lands to gather Well-Wishers, Retainers and Array troops and lead them into battle. Spend too much time recruiting and you'll find your side already beaten leaving you nothing for it but to abandon your troops and flight to the Continent! You have to act quickly and often risk the game on one move that will make or break your claimant's chance at the throne...
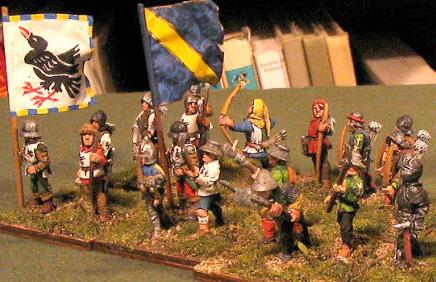
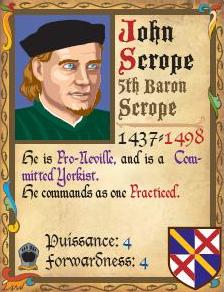
By the way, we have included quite a few nobles in the game, and each has his own "baseball card" with his characterists on the front and a brief history on the back, topped off with a spiffy and unique portrait for each person!
Scenarios?
There are scenarios from 1455 to 1464 in the current version of the game. There is a planned expansion that will take you all the way up to the end of the period.
Oh, that Warwick!
Ahem...some Lancastrians, please?
Before you start thinking Lancastrian/Yorkist, it is important to remember that few nobles thought in such terms. Most looked to the side that could advance their dynasty, would support them against their neighbours encroachments, would back them in court. It was really York's killing of so many Royalist Lords at the "battle" of St. Albans I (more like a gang rumble in the streets) that hardened many Lords on one side or the other, and even some who lost fathers and brothers would eventually side with their family's killers out of necessity or need for advancement. .
One of the few "Die-Hards" of the period, he died hard at Hexham in 1464
To take a
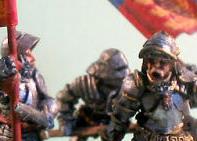
look at the miniatures rules that go with the campaign, click on the image to the right.
Is there a miniatures interface?
What kind of question is that? OF COURSE there is a miniatures interface!
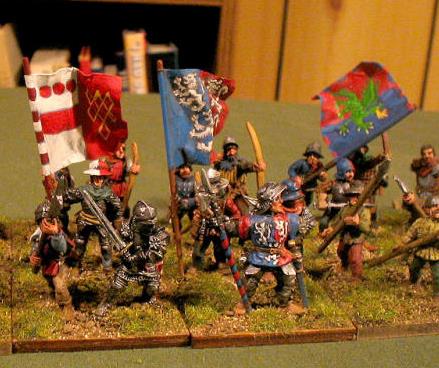
A Coat of Steel allows you to play out campaign battles (if you so choose) on the tabletop. You can convert the contingents in the Campaign directly into units of figures. Click on the image below to take a look:
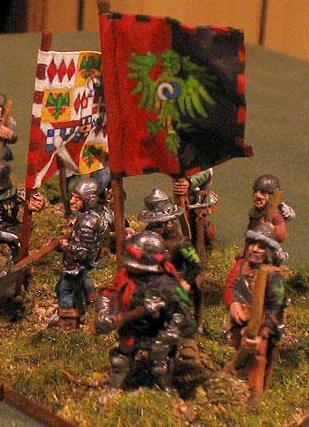
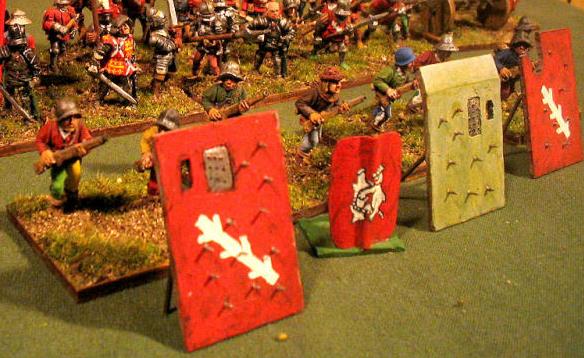
A Campaign AND Miniatures game system


The Replays
To help you follow along, refer to the map
thumbnail provided here-)
The Calais Lords Return- 1460
We decided to try the basic rules only, leaving the optional rules
(mostly dealing with recruitment) for the next test.
This scenario begins in late June of 1460, when the Yorkist lords who had fled from King Henry's army at Ludford and sought refuge in Calais have made a bridgehead at Sandwich. The actual campaign lasted from their landing on June 26th until the battle of Northampton on July 10th- a mere 14 days. Our campaign turns are from around 4
to 7 days long each.
The game starts with the Calais Lords (Warwick, Salisbury, March, Fauconberg and Audley) having just landed at Sandwich. They only have their riding retinues and two contingents of the Calais garrison with them- about 30 stands or 1500 men- plus the Papal Legate Coppini. Wenlock has been left behind in Calais to keep an eye on
Somerset, who is holed up in Guines Castle. York is in Dublin with a few men- although he can recruit, he only has a slim chance to show up in the scenario (on a roll of 11+ on 2D6, and only in the last 3 turns of the game). The other Yorkist magnates (Norfolk, Abergavenny and Viscount Bourchier) will only activate if the Calais lords enter London.
Meanwhile, The King is at Coventry in the care of Buckingham, along with Shrewsbury, Viscount Beaumont, Egremont and Ruthyn. The Lancastrian had a fortified camp option to place, but he chose to place it at Shrewsbury instead of Northampton (where it actually was placed historically). The lords Scales and Hungerford hold London, rounding out the active Lancastrians. Their inactive magnates are Devon, Pembroke, Clifford and Northumberland, respectively in Okehampton, Tenby, Pontefract and Alnwick, holding down their regions against a possible invasion from York in Ireland or the King of the Scots. They will only activate if their regions are invaded, if the Yorkists take London, or if the Duke of York returns from Ireland. Margaret and young Prince Edward are awaiting events in Chester. The game is 5 turns long, with Yorkist Campaign Morale (CM) at 7, and the Lancastrians at 6.
On the first turn, the Lancastrians nominate Buckingham's host (2 Forewardness) to move, and the Yorkists, Warwick's host (4 Forwardness). They both add 1d6 to their ratings, and Warwick wins and moves first, since Buckingham is made of molasses. He decides to pay 1 move point (he gets points equal to his forwardness) to issue a Commission of Array (CoA) for Kent. He and Fauconberg have good influence in the region (+3 and +2
respectively, due to their fame along the coast (i.e. Piracy against their trade rivals)- to which they each add Papal Legate Coppini's +1) and raise 3 for Warwick, and 3 for Fauconberg (help from Coppini's modifier). Warwick also picks up 2 Well-wishers (tenants and other clients) from the area for free (one of which is a gonne). He has three movement points, so he goes to London, and attempts to convince the burgers to let him in. He must get 11+ on 1D6, but as he can add any of his magnates' influence for Kent, and Coppini's modifier (total +6) he easily makes it. By special rules, Scales and Hungerford get bottled up in the Tower, unless all Yorkists abandon the city. If Warwick had failed to convince the Londoners to join him, the two Lancastrians might have had a chance to flee to the Kings army, or remain and force the Yorkists to garrison the town when they take it. The loss of London
activates all the inactive magnates for both sides (active next turn), and lose the Lancastrians 3 CM. That ends Warwick's move.
Now Buckingham's host starts his move. Since he can pick up Well-wishers (WW) for himself and the Earl of Shrewsbury for free in the West Midlands, he does so (total 5 counters, but one was a note of excuse- damned trimmers!- so only 4 contingents); but he decides that he won't spend one movement point (he has only 2 Forwardness for being a plodding old soldier) to call a commission of array there, as his magnates have greater influence in the East midlands. He moves one space, choosing Leicester (instead of the historical Northampton)
as it is one outside of Warwick's range from London, taking into account Warwick spending 1 move point to raise troops before he leaves the city. We picks up WW for Beaumont and Ruthyn and pays his last move point to raise a small handfull of CoA contingents as well. He feels safer now, as his host is about the same size than Warwick's, and he believes that he may be able to move north for one turn and link up with Clifford (who moves 4, and is only in Pontefract), and then return to the midlands. He cannot achieve his basic victory conditions for the scenario if he does not have Henry VI physically in the midlands (leaving would be in the eyes of the people
and Lords a surrender of the government to the Yorkists), but only one turn out of it shouldn't hurt. His round ends, and the first turn as well.
The second turn begins with the same two hosts being nominated, and Warwick winning first again. Warwick's in a little trouble; as the short scenario goes on, if he lets Buckingham draw in all his far flung supporters, he will overwhelm the Calais lords and their few friends. He must strike quickly, as the historical Warwick did. He
now has more supporters active, including Abergavenny, who is placed anywhere in Kent; as London borders Kent and the South Midlands, he places him right in his space. He calls in Abergavenny's WW contingents, and pays 1 move point to Array more CoA with his Kentish influence. Between Warwick, Fauconberg and Bergavenny, they raise a small pile of contingents. He now has a choice; he could either try to link up with Bourchier and Norfolk somewhere in Essex or East Anglia, and then move into the Lancastrian heartland in the midlands, or he might make a bold forced march and catch Buckingham while he has a slight advantage. The danger is that a battle following a forced march might leave some of his troops straggling, and not
present in the actual tabletop engagement, or he might miss the roll, and be out of position to link up with his eastern friends, costing him another precious turn to gather them in. He decides to take his chance with the force march, and moves to Northampton, one space from Buckingham's host. He then rolls a die against his own Forwardness number, and gets a 2 which is less than his 4- he makes it. He is placed in Leicester with his prey, and his part of the turn ends with him declaring his intention to fight.
It's now Buckingham's turn- if he fights and fails he's taking a chance on losing the scenario early. A loss will cost him 3 CM, putting him at zero- ending the scenario with the flight of his remaining lords to the north. But if he successfully disengages from Warwick, he'll still pay 1 CM for his evasion- better, but not so great. He attempts to disengage; but that's easier said than done, because he must roll 1D6 , and must get double against Warwick's roll
of 1D6 (modified by the difference between their Forwardness ratings; so he must roll a 6 and Warwick a 1). He fails the roll, and must fight.
Now usually we'd move to the tabletop for the next bit, but as we were just testing the campaign rules, we figured out a formula (using simple ratios, similar to the battles in Kingmaker) and some random rolls for resolving a battle. We hadn't written the campaign battle rules at the time, so we came up with a quick resolution system in the meantime. The forces were about 25 Yorkist contingents (approx. 80 stands) to about 18 Lancastrians (approx. 55 stands). Turning a traitor has its own mechanism in the battle rules, so we made up a roll for Ruthyn in this instance, but he passed the roll, and stayed on the Lancastrian side.
The upshot of all this was that Buckingham lost the tussle; in the flight he was slain, along with Viscount Beaumont, while Henry VI was captured- not so bad as the actual battle of Northampton (especially as the hated Egremont escaped- Boo Hiss!), but still a catastrophe. He lost 3 CM for the battle, 1 CM for a Peer killed, and 2 CM for letting the Yorkists capture an enemy claimant (Henry VI)- dropping him well off the CM track. A Major victory for the Yorkists.